Friday, April 29, 2011

Circle Challenge: Reduce, Reuse, Recycle

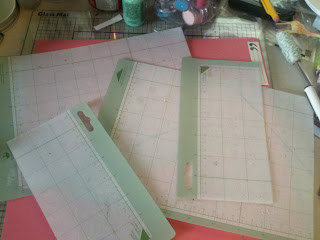
This month's Circle Challenge was to create a project and reuse, recycle, or repurpose 3 items, and include at least 2 Cricut cuts. I decided to think outside the box.... or, more accurately... think of my own box purse! I have been saving my old Cricut mats for years now, and finally figured out something to do with them. I used two old mats to cut the base for my purse (roughly 10"long, 3.5"wide, 7.5"deep) and attached using packaging tape.

After taping, I used my MS scoreboard to score folds before gluing the paper onto the mats. 
 Coming along...
After I did the outside, I put paper on the inside, as well. K&Co. had some cute light green paper (12.24) I was able to use so that the bottom didn't have edges... they were just folds. 
The next reused item was the ribbon I trimmed the purse with and used as a handle. When my Sophie had pups, they began wandering very early, and I desperately needed something to tie them up with, since they were too small for collars/leashes. I was able to make little collars and leashes using my beloved ribbon. You can't even tell it spent 4 weeks tied to my porch with a little munchkin on the end, can you?!? :-D 
 I used grommets to reinforce the handles, and then on the back I made a real pocket, just for fun. 

My third reused item (if you don't count the paper stack I have recycled many times for various projects, and the fact that I used scrap paper for all of the solids except flowers/sun) are a few of the Cricut cuts. The red scallop came from something else, and I noticed it only after cutting out one from patterned paper, thinking it looked too flashy. I can't remember what project I had originally used the red scallop for, but it fit perfect, I think, behind the tree. It actually fit even more perfect than the circle I cut out but didn't like! And the fence was leftover from the bulldog house I made for my school. It definitely looks better on here than it did there! I was able to trim off the parts I had ripped off the doghouse, and ink it and add nails as necessary. The birdies also covered up accident-spots. 

I used Straight from the Nest for the birds 3.5" and the tree at 5" (except for Sentimentals, for the red back part... I have no idea what I had cut that out at originally), and Paper Doll Dress Up for the picket fence. In order to color match, I used my Imagine to print and cut the flowers and sun from Give a Hoot (I can't believe I'm saying this, but I actually forgot that I had received it for Christmas until I was letting my little sister borrow my craft room for an FCCLA project yesterday!) A cute face was the perfect stamp on the sun, which of course I got from Peachy Keen stamps.  I cut the owl in the tree from the paper stack. Here are a few more pictures... hopefully at least one of them will do it justice!


And of course I stamped the bottom to prove that I really did make it! I love the wood pattern!
Thursday, April 28, 2011

Home Projects

During spring break, I had two minor house projects I really wanted to get done. We've had trouble with our deadbolt on the front door for about a month now, so I bought a new handleset to put on. Of course nothing is ever as easy as it seems. After I took the old one off (which took awhile! There were no screw holes) I decided to paint the door to give it a fresh look, and cover up the old handle spot. I went for "An Apple a Day" red, which is slightly more red than the burgandyish color that was on it before. It turned out goregous. Then I put on the new deadbolt/handleset, which took HOURS and help from my mom. Apparently I had the inside lever on backwards! Oops! Anyway, this was a necessary project and I love the way it turned out. If you visit me, you'll be greeted this way! 


The second project I wanted to complete was a new chandelier in the kitchen. We had a fluorescent light, and stinkbugs loved to crawl up in it and die, which is not appealing. The ceiling is pretty low, so I tried to keep the new light under 18 inches. My little sister helped me pick out a beautiful Tiffany chandelier, which doesn't put out as much light as the fluorescent did, but I think it's absolutely gorgeous. It was a hassle to put up, though. The old owner did not put the light in the stud, so we had to come up with an alternative to ensure the new light would be stable. After a couple trips to the hardware department, and a few journeys into the attic (not me- I was too scared!) we were able to brace it (somehow) and get it held. I love love love it!

Wednesday, April 27, 2011

Cricut Onesies

I was playing around a couple nights ago and made a couple of onesies for Whitney's babe using my Cricut. I didn't have any freezer paper to make stencils, so I used vinyl. I am slowly getting the hang of it; I can't wait to get more practice!


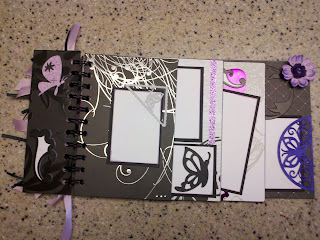
Black/Purple Butterfly Album

Here is a small album I made a week or so ago with the paper I’ve been DYING to use. 
 It’s black and white, with purple/teal accents, and I used chipboard die cuts and pretty butterflies to decorate it. I’ve just got to add that I LOVE my cinch Kymberlee sent me for Christmas, and I LOVE the French Manor cartridge from the Circle. It’s my go-to for prettiness!


 I also included a beautiful flower I made with my cuttlebug quilling kit Kymberlee sent awhile back. I love making flowers with it. I have no idea what to do with the book, so I told my little sister she needed to get a purple prom dress so she can have it!


In other news, I am SOOO close to being finished with Whitney’s baby book. Just need to integrate seasonal pages with a safari theme! (So far I’ve got Santa driving a train full of presents, elephants, hippos, and lions for Christmas, and a snake coming out of an egg with bunny ears for Easter). I still need Summer, Halloween, Thanksgiving, Valentine’s Day, and a page for their move from California to Colorado. Ideas please! I can’t wait to show pictures when I’m all done. It’s been a labor of love. 

Easter Collage

Here is the collage my kids in Children's Church have been working on in the weeks leading up to Easter Sunday. Each week I taught one "piece" of the Easter story, and they participated in an art activity to create a symbol for each lesson.

Week 1: Palm leaves made from construction paper, felt, tissue paper, and pipe-cleaners
"The next day, the news that Jesus was on the way to Jerusalem swept through the city. A large crowd of Passover visitors took palm branches and went down the road to meet him. They shouted, 'Praise God! Blessings on the one who comes in the name of the Lord! Hail to the King of Israel!' Jesus found a young donkey and rode on it, fulfilling the prophecy that said: 'Don't be afraid, people of Jerusalem. Look, your King is coming, riding on a donkey's colt.'" John 12:12-15 (NLT)


Week 2: Communion glasses and bread colored and cut out, after participating in our own service with grape juice and crackers
"When the time came, Jesus and the apostles sat down together at the table. Jesus said, 'I have been very eager to eat this Passover meal with you before my suffering begins'... He took some break and gave thanks to God for it. Then he broke it in pieces and gave it to the disciples, saying, 'This is my body, which is given for you. Do this to remember me.' After supper he took another cup of wine and said, 'This cup is the new covenant between God and his people-- an agreement confirmed with my blood, which is poured out as a sacrifice for you.'" Luke 22:14-15, 19-20 (NLT)


Week 3: Painted crosses on kraft paper
"Carrying the cross by himself, he went to the place called Golgotha. There they nailed him to the cross. John 19:17-18 (NLT)


Week 4: Easter lilies to remember Christ's resurrection and share the Good News with others
"Jesus came and told his disciples... 'Go and make disciples of all the nations... And be sure of this: I am with you always, even to the end of the age.'" Matthew 28:18-20 (NLT) 

Sunday, April 17, 2011

Another Flower Card/ Pop Ups

Here is another card I made last night, after going all over Roanoke to find the new Everyday Pop-Up cartridge. I played around with several of the popups, then decided to make a cute vase with flowers with some scraps of paper I had laying around. It seems like a common theme that my best projects come from scraps! I used Pajama stripe? (or something like that) embossing plate on the blue background, though you can't see it well in the picture. I think it turned out beautiful! 


Here is a pop up chandelier I made just for fun, too. I love the cute cards that go along with the images; the only difficult seems to be figuring out what size the shape inside each card should be to fit properly. For a 5 inch height, around 3.5-3.5 inches seem to fit well, so far. I've only tried a few of the images, though. I also got to practice my glitter techniques :-D. 

Flowery Birthday Card

Here is a flowery birthday card I made using French Manor and Walk in My Garden. It's not what I had pictured, but fine nonetheless. It just so happens that this week's Circle challenge is to make flowers, so I think this counts! Yay! I've never entered one before, and it's random, so I've actually got a chance. It's an easel card, which is something I haven't made in awhile. I used a flower and brad to hold it up. I hand cut the flowers, and added pearls and ribbon. I'm kinda proud of myself in that I used all white paper for this card... used pink and green stamp/chalk stuff, and misted walnut dye for the wooden lattice.


Saturday, April 9, 2011

From Kymberlee

I just realized that I hadn't posted this picture, so here is the gift Kymberlee sent me that I got just before my birthday. Isn't she amazing!? I love love love the canisters... I filled them up right away! I also cleared a spot on my wall for the wall hanging, and I used some of the ribbon to make a card for my little sister's birthday. She also sent me some cinch wires (which I used yesterday while working on a new album) and I've used most of the stamp colors, too. I can't wait to use the puppy stamps. I'm really excited about those! What a great surprise! She also sent me a giftcard for Papertrey Ink (I can't remember if I've mentioned that) but I didn't take a picture when the order came, because I had to rush to my mom's house so I opened up my goodies there. I will post pictures as I use the items, though (like the jar stamp set, jar die for my cuttlebug, and coordinating accessories stamp set). I also got leaf ribbon, beautiful white polka-dot ribbon, bakers twine, a scalloped-edge die, and a glue pad. I am officially addicted to them! Anyway, here is a picture of the awesome box she sent. 

Cards

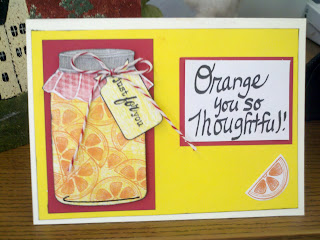
For my birthday, Kymberlee bought me the cutest stamps from Papertrey Ink. I made several thank-you cards with them last weekend.

Here for my sister (Since she painted me the gorgeous dogs!)


Here's the one I made my mom... my favorite pen busted while I was working on it and so I had to write the words with another pen... totally looks homemade :-/


And here's one I made (but forgot to give) to a lady at school who was collecting kitchen-themed items for a giftbasket. I used paper printed from Kate's Kitchen. 

Thursday, April 7, 2011

Birthday Card for Allycat

Funny story. I made my little sister a birthday card (her birthday was even before mine- that's how far behind on life I am) and put it in the top of her box, since I didn't have an envelope. Somehow, as she was opening the box, she flung the (beautiful, time-consuming, precious) card I made and it fell in the dog's water bowl. And of course since I FINALLY used my imagine to make a card instead of "real" cardstock, the image immediately blurred and eventually disappeared. Haha. Maybe I should stick with regular paper and not try printing. I used Imagine More Cards for this, along with the pretty pretty ribbon Kymberlee sent me. 


Stickles and Glitter Shelf

A week or two ago (yep, they're all running together) I added some leftover shelving (from my Cricut shelves) to my windowsill to have a place to keep all of my stickles and glitter within reach. I used several flowery cuts and some super cheap K & Co. paper to make a collage on top (The reason I didn't use the shelf originally was because I ruined the top of it after painting it white last summer). I think it turned out pretty cute, and I'm loving the convenience! 


Here's a close up of it... The colors are hard to see, however. Lots of layers!

Birthday Gifts

I have been so flippin' busy lately. I don't feel like I've had time to sit down at my computer in weeks! My first post is to celebrate my birthday (wow... it's already been more than a week ago!) My bbf Kymberlee sent me an amazing box of goodies, including this wall hanging she made for me.

And my older sister has owed me a painting for awhile, so for my birthday she finally did it. This is exactly what I wanted... my fav pups!

Learning to Watercolor

  My sweet sister bought me a "Learn to Watercolor Nature" book for my birthday, along with a watercolor palette. I've been pr...