Showing posts with label Harry Potter. Show all posts

Tuesday, July 23, 2024

Library Shelf Stained Glass

 My basement guest room has a deep window that is eye-level with our drive-way. When we moved in I decorated the room with a dark cottage core/Harry Potter universe vibe, and wanted to cover the window with more than a piece of black fabric. 

As my skills are continuing to grow I decided to branch out in using lead came to frame my work. This is the first piece I did and it fit perfectly! I was so nervous about that. If you know me, you know measuring is not something I'd call a strength. 

I found lots of great ideas on Pinterest, especially TerrazaStainedGlass on Etsy. They do incredible work! My quality is no where as good, but I was able to draw out what I wanted (and add a rubbery duck half-way through when my shapes got off a little) and I'm proud of what I created. 


Wednesday, July 3, 2024

Griffin Stained Glass

 I created this 12x18 panel for my nephew, who isn't old enough to appreciate it yet but hopefully will one day. I wanted to document the process so I tried to take tons of photos. I was really proud of this one, as I used this photo I saw online from a book to reach my vision. I think it's from a Fantastic Beasts book, but the search feature led me nowhere. 


First I traced the photo with Procreate on my iPad. I did this several times, simplifying over and over again until I had pieces that I was comfortable cutting out with glass. Not having too many intersecting angles and tiny bits that would get covered by solder are top priorities. After drawing it about 7-8 times, I had this image.

I added a background and printed it out full size on sticker paper. I should've printed out an additional copy to lay my pieces down on as I cut them, but hey, I'm still learning! I cut out each sticker by hand as a template for my glass sizes. This was a process. 
A lot of artists cut out all pieces and foil them first, but I tend to do bits at a time. I did the entire frame first, to make sure my size was good. 

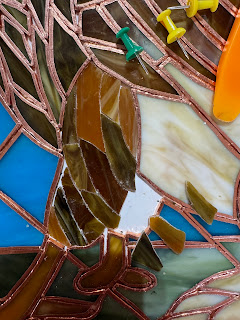
Here is the process of stained glass with one of the trees. 
1. Cut out the pattern. I numbered the pieces to do different shades of green and then changed my mind. Also at that point my pieces weren't quite lining up so I traced what I had already foiled to make a somewhat new pattern. 
2. Lay out the pieces on the glass. I used sticker paper which is genius. I also like to add a straight line to I'll line up the direction of the glass correctly. 
3. Cut out the glass pieces. 
4. Grind each piece to remove rough edges. The better the cut, the less grinding there is. I'm definitely still learning this. 
5. Put it together.
6. Remove the sticker paper and lay it out to make sure it fits. You'll see that piece in the middle with the space didn't look like a big deal at this time. 
7. Add copper foil and pin down. Look for any inconsistencies. You'll see that little hole is bitter so I wanted to redo it. 
I put a piece of sticker paper down, traced, recut and ground down, and then re-foiled. 
And there you have it, a tree! 


After finishing the foiling, I soldered the panel and scrubbed clean. I also added two hooks at the top. 

I used a black patina to stain. And cleaned again! 

Then I added a nice polish. 

And here is the finished project. 


Monday, July 26, 2021

New Cabinet Labels and Harry Potter Keys

I have been SO busy moving into our new house this month, cleaning and painting, trying to decide where to put everything, sorting and organizing. I finally had a chance to unpack my new craftroom (pretty much the whole basement!!!) and one of the first things I made were these labels for my IKEA drawers. I've had the shorter one for years (I painted the front of each drawer with chalkboard paint originally) but just got the tall one recently (as we now live fairly close to IKEA!) I used my Cricut to make the labels, which I think turned out super cute! 


Also, I'm decorating the downstairs guest room Harry Potter themed, so I bought a ton of keys on Amazon and have been busy gluing wings on them. I have no idea how I'm going to decorate with them yet, but they are so cute! 


Saturday, October 18, 2014

{More} Harry Potter Wands


Here I am on Halloween! 
 And my little sister came by the school dressed up, as well!

Tuesday, December 3, 2013

HP Wand-Making

*Here's to hoping my little sister doesn't happen upon this post before Christmas!*

My little (college-aged, not really little!) sister finally finished reading Harry Potter this year, so she and I finally have something in common! I ordered her all kinds of HP-themed things for Christmas this year (Griffindor scarf, muggle t-shirt, snitch necklace, etc.) but decided to make the wand myself. I looked up several tutorials on Pinterest (my go-to site for EVERYTHING these days) and figured out how to make one... or a bunch... using materials I had on hand.

I started out with several bamboo skewers and wrapped random items around the bottom few inches of each one. Then I covered the objects with hot glue. For some, I just played around with the glue (slowly watching it run as I twirled it around and added a few drops of gold Tim Holtz Adirondack alcohol ink mixative. 


It was a little messy!

I painted on the mixative after the glue was dry over the entire wand on this one.

Here is a button I wrapped in a bit of fabric and added a rubber band for dimension.

This one- an old clothespin glued to the end of a skewer- was my favorite! 

 You can see how I'm adding more glue and more gold coloring on each one. They all turn out differently.

I swirled glue around the entire skewer of them when the base was warm enough to handle. On some of them I made a spiral pattern, on others I pressed the glue gun tip onto the wood to smear the glue around. Both gave awesome effects.

I colored them with various shades of brown copic markers. I'm pretty sure I ruined a couple nibs, but the result was well worth it!

And here they are! Seven finished wands, each magically perfect in its own way!


I'm not sure what I'll do with the extras just yet... but I couldn't resist making several!

Library Shelf Stained Glass

 My basement guest room has a deep window that is eye-level with our drive-way. When we moved in I decorated the room with a dark cottage co...